Why a DIY Hair Mask Works Wonders
Welcome to the world of homemade hair care, where your kitchen pantry holds the key to healthier, more radiant hair. A DIY hair mask is a conditioning treatment made from natural, everyday ingredients. Unlike many store-bought products that can contain complex chemicals, a homemade mask offers a simple, transparent, and potent way to nourish your hair. The beauty lies in its freshness and customizability. You control exactly what goes onto your hair, targeting specific concerns like dryness, damage, or frizz with pure, active ingredients.
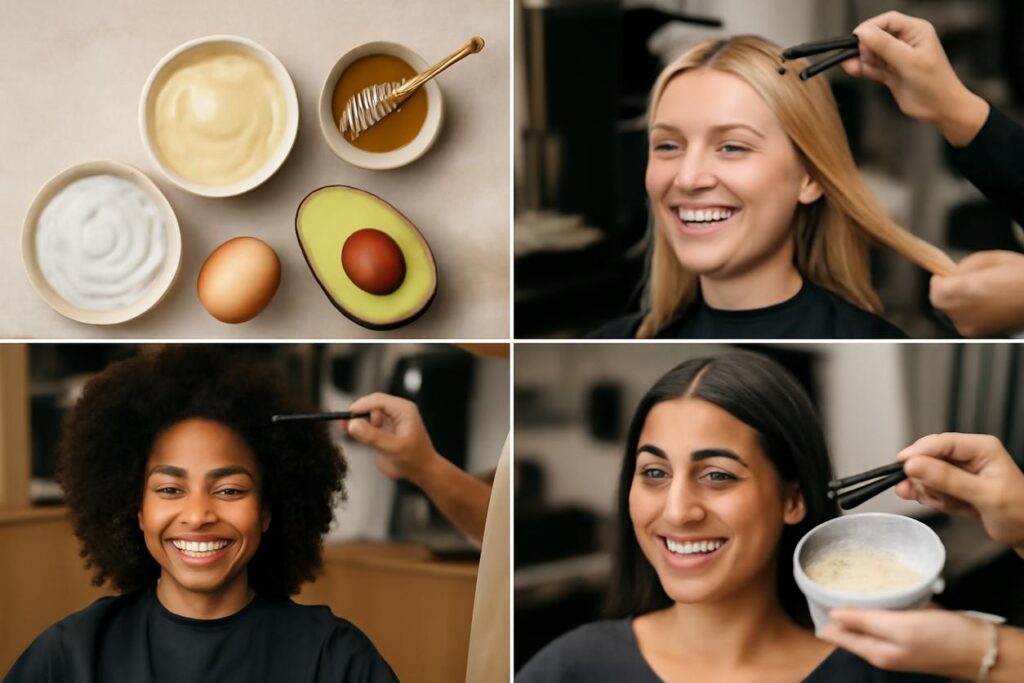
By creating your own treatments, you can avoid silicones, parabens, and sulfates, focusing instead on the raw power of vitamins, proteins, and healthy fats found in ingredients like avocado, yogurt, and olive oil. It’s an empowering, cost-effective, and sustainable approach to achieving the hair of your dreams.
How Hair Masks Affect Hair Structure and Moisture
To understand why a DIY hair mask is so effective, it helps to know a little about hair structure. Each hair strand has an outer layer called the cuticle, which is made of overlapping scales. When hair is healthy and moisturized, these scales lie flat, creating a smooth, shiny surface. When hair is dry or damaged, the scales lift, leading to a dull, rough, and frizzy appearance.
A hair mask works by providing a concentrated dose of nourishing ingredients that penetrate the hair shaft. Moisturizing ingredients like oils and humectants replenish lost lipids and water, while proteins temporarily patch up gaps in the cuticle. This process helps to smooth the cuticle, lock in moisture, increase elasticity, and protect the hair from further damage, leaving it feeling soft and manageable.
Safety First: Allergy Checks and Patch Testing
Just because an ingredient is natural doesn’t mean it’s right for everyone. Allergies and sensitivities can occur with any new substance, so safety should always be your first step. Before applying any new DIY hair mask to your entire head, perform a patch test.
How to Perform a Patch Test
- Mix a small amount of your intended hair mask recipe.
- Apply a dab to a discreet area of skin, such as behind your ear or on your inner elbow.
- Wait 24 hours. Avoid washing the area during this time.
- Check for reactions. If you experience any redness, itching, swelling, or irritation, do not use the mask. Wash the area immediately with soap and water.
Be particularly cautious with potent ingredients like essential oils (which should always be diluted in a carrier oil) and acidic ingredients like lemon juice or apple cider vinegar. When in doubt, start with simpler, gentler recipes.
Identify Your Hair Concern and Choose Ingredients
The most effective DIY hair mask is one that is tailored to your specific needs. By identifying your main hair concern, you can select ingredients that will deliver the best results. Here’s a simple guide to get you started:
| Hair Concern | Key Ingredient Types | Pantry Examples |
|---|---|---|
| Dry, Brittle Hair | Humectants and Rich Oils | Honey, Aloe Vera, Avocado, Olive Oil, Banana |
| Damaged, Weak Hair | Proteins and Strengthening Oils | Egg, Greek Yogurt, Gelatin, Coconut Oil |
| Frizzy, Unruly Hair | Smoothing Agents and Sealing Oils | Banana, Avocado, Argan Oil, Jojoba Oil |
| Oily Scalp or Dandruff | Clarifying and Soothing Agents | Apple Cider Vinegar, Tea Tree Oil, Bentonite Clay, Oatmeal |
| Dull, Lackluster Hair | Shine-Enhancing Agents | Apple Cider Vinegar, Honey, Green Tea |
Ingredient Guide: Proteins, Humectants, Oils and Botanical Boosters
Understanding your ingredients is the key to becoming a home-formulation pro. Most DIY hair mask recipes are built from a combination of these core components.
Proteins
Proteins are the building blocks of hair. A protein-based mask helps to temporarily fill in gaps in the hair’s cuticle, strengthening it and reducing breakage. Be careful not to overdo it, as too much protein can lead to stiffness.
- Greek Yogurt: Contains lactic acid to cleanse and protein to strengthen.
- Egg: The yolk is rich in fats and vitamins for moisture, while the white is packed with protein.
- Gelatin: Binds to hair to create a temporary strengthening film.
Humectants
Humectants are ingredients that attract water from the atmosphere and draw it into the hair shaft, providing deep hydration.
- Honey: A natural humectant with antibacterial properties.
- Aloe Vera Gel: Packed with vitamins and enzymes that moisturize and soothe the scalp.
- Agave Nectar: Similar to honey, it’s excellent for attracting moisture.
Oils (Emollients and Sealants)
Oils are essential for locking in moisture and smoothing the hair cuticle. They can be broken down into two main types:
- Penetrating Oils: These oils have a smaller molecular structure and can penetrate the hair shaft to moisturize from within. Examples include coconut oil, avocado oil, and olive oil.
- Sealing Oils: These oils have a larger molecular structure and sit on top of the hair strand, sealing in moisture and adding shine. Examples include jojoba oil and argan oil.
Botanical Boosters
These are extras you can add to your mask for targeted benefits.
- Green Tea: Rich in antioxidants and can help promote a healthy scalp.
- Rosemary Oil: Known for its ability to stimulate the scalp.
- Chamomile Tea: Can soothe an irritated scalp and add subtle brightness to blonde hair.
Pantry Base Recipes: Creamy, Oil-Based and Water-Based Starters
Before diving into full recipes, it’s helpful to understand the three fundamental types of mask bases you can create. These are your starting points for experimentation.
Creamy Base
Ideal for moisture and nourishment. This base is thick and easy to apply. Start with a primary creamy ingredient and build from there.
Example: 1/2 mashed avocado or 1/2 cup of full-fat Greek yogurt.
Oil-Based Base
Perfect for an intense hydration or pre-shampoo treatment. This is simply a blend of beneficial oils.
Example: 3 tablespoons of a carrier oil like olive or coconut oil, warmed slightly.
Water-Based Base
A lightweight option for those who need hydration without heavy oils. This base is great for fine hair.
Example: 1/2 cup of cool green tea or 1/2 cup of pure aloe vera gel.
Recipe Collection: Eight Clear DIY Hair Masks
Here are eight tested recipes to get you started on your DIY hair mask journey. Always blend ingredients until smooth to avoid chunks in your hair.
1. The Deep Hydration Mask (For Dry or Thirsty Hair)
- Ingredients: 1/2 ripe avocado, 1 tablespoon olive oil, 1 tablespoon honey.
- Instructions: Mash the avocado until completely smooth. Stir in the olive oil and honey until you have a creamy paste.
- Time: 20-30 minutes.
2. The Protein Power Mask (For Damaged or Weak Hair)
- Ingredients: 1 egg, 3 tablespoons full-fat Greek yogurt.
- Instructions: Whisk the egg and yogurt together until fully combined.
- Time: 15-20 minutes. Important: Rinse with cool water to avoid cooking the egg in your hair.
3. The Frizz Fighter Mask (For Unruly Hair)
- Ingredients: 1 ripe banana, 1 tablespoon argan oil.
- Instructions: Blend the banana thoroughly until no lumps remain (this is key!). Stir in the argan oil.
- Time: 25 minutes.
4. The Scalp Soother Mask (For Itchy or Irritated Scalps)
- Ingredients: 1/2 cup cooked oatmeal (plain, cooled), 2 tablespoons aloe vera gel.
- Instructions: Combine the cooled oatmeal and aloe vera gel in a bowl.
- Time: 20 minutes. Focus application on the scalp.
5. The Shine Enhancer Rinse Mask (For Dull Hair)
- Ingredients: 2 tablespoons apple cider vinegar (ACV), 1 cup cool water, 1 teaspoon honey (optional).
- Instructions: Mix all ingredients in a spray bottle or jug. This is a final rinse, not a thick mask.
- Time: Apply after shampooing and conditioning, leave for 2 minutes, then rinse lightly.
6. The Growth Promoter Mask (For a Healthy Scalp Environment)
- Ingredients: 2 tablespoons coconut oil, 3-5 drops of rosemary essential oil.
- Instructions: Melt the coconut oil until it’s liquid but not hot. Stir in the rosemary essential oil.
- Time: 30 minutes. Massage gently into the scalp.
7. The Damage Repair Mask (For Porous or Processed Hair)
- Ingredients: 1 tablespoon unflavored gelatin, 1/2 cup warm water, 1 tablespoon honey.
- Instructions: Dissolve the gelatin in warm water until no granules are left. Stir in the honey. The mixture will thicken as it cools. Apply while still easy to spread.
- Time: 20-25 minutes.
8. The Clarifying Cleanse Mask (For Product Buildup)
- Ingredients: 2 tablespoons bentonite clay, 2 tablespoons apple cider vinegar, 1 tablespoon water.
- Instructions: In a non-metal bowl, mix the clay and liquids until a smooth paste forms. Add more water if needed.
- Time: 10-15 minutes. Do not let it dry completely on your hair.
Application Technique: Step-by-Step for Best Absorption
How you apply your homemade hair mask is just as important as the recipe itself. Follow these steps for maximum benefit.
- Start with Clean, Damp Hair: Shampoo your hair first to remove product buildup, then gently towel-dry until it’s damp, not dripping wet. This allows the mask to penetrate more effectively.
- Section Your Hair: Divide your hair into 4-6 manageable sections using clips. This ensures you get even coverage.
- Apply Methodically: Using your fingers or a dye brush, apply the mask to each section. For moisturizing masks, focus on the mid-lengths and ends. For scalp-focused masks, gently massage the mixture into your roots.
- Distribute Evenly: Once applied, use a wide-tooth comb to gently distribute the mask from root to tip.
- Cover and Wait: Pile your hair on top of your head and cover it with a shower cap or plastic wrap. For an extra boost, wrap a warm towel around the cap. The gentle heat helps open the hair cuticle for deeper absorption.
Timing, Frequency and Post-Mask Care
How Long Should You Leave it On?
Most moisturizing and nourishing masks can be left on for 20-30 minutes. However, be careful with protein-heavy masks (like those with egg or gelatin), as leaving them on for too long can cause the hair to feel stiff. For these, stick to a 15-20 minute maximum.
How Often Should You Use a DIY Hair Mask?
A good starting point is once a week. If your hair is extremely dry or damaged, you might benefit from twice a week initially. If your hair is relatively healthy or fine, once every two weeks may be sufficient. Listen to your hair—it will tell you what it needs.
Post-Mask Care
Rinse your hair thoroughly with lukewarm water until the water runs clear. Hot water can strip moisture, while cold water may not effectively remove oil-based masks. After rinsing, you can apply a small amount of your regular conditioner to seal the cuticle and lock in all the benefits of your treatment.
Troubleshooting Common Outcomes and How to Adjust
Sometimes your first attempt at a DIY hair mask might not go as planned. Don’t worry! Here’s how to fix common issues.
- My hair feels greasy or weighed down. This usually means you used too much oil or didn’t rinse thoroughly enough. Next time, reduce the amount of oil in your recipe or add a clarifying ingredient like a teaspoon of apple cider vinegar. Ensure you rinse until your hair feels clean.
- My hair feels stiff and brittle. This is a classic sign of “protein overload.” Your hair has had too much protein and not enough moisture to balance it out. Reduce the frequency of protein masks and focus on purely moisturizing recipes (like the Deep Hydration Mask) for your next few treatments.
- I don’t see any difference. This could be for a few reasons. The ingredients may not be right for your hair’s porosity, you may not have left it on long enough, or you didn’t apply enough product. Try another recipe targeting a different concern, and ensure your hair is fully saturated with the mask.
Personalization Experiments: Small-Batch Tweaks and Tracking Results
The true power of a DIY hair mask is personalization. As we look toward hair care strategies for 2025 and beyond, a data-driven personal approach is key. Treat your hair care like a science experiment.
Start a Hair Diary
Keep a simple log of your mask experiments. Note the following:
- Date and Recipe: The exact ingredients and measurements you used.
- Application Details: How long you left it on and whether you used heat.
- Immediate Results: How your hair felt right after rinsing (soft, strong, shiny, etc.).
- Next-Day Results: How your hair looked and felt 24 hours later.
By tracking this, you’ll start to see patterns. You might discover your hair loves coconut oil but hates olive oil, or that 20 minutes is your sweet spot for a yogurt mask. Make only one small tweak at a time—for example, swap avocado oil for olive oil in a recipe—to accurately gauge its effect.
Quick Fixes: 10-Minute Masks for Same-Day Rescue
Don’t have 30 minutes to spare? These quick treatments can provide an instant boost.
- Instant Shine Spray: Mix 1 part honey with 4 parts warm water in a spray bottle. Lightly mist over hair, leave for 10 minutes, and rinse.
- Frizzy End Tamer: Warm a tablespoon of coconut or argan oil in your hands and apply only to the last few inches of your hair. Leave for 10 minutes before shampooing.
- Quick Moisture Shot: Apply pure aloe vera gel to damp hair, focusing on dry areas. Let it sit for 10 minutes before rinsing.
FAQ: Common DIY Hair Mask Questions Answered
Can I store my leftover DIY hair mask?
It is always best to make your mask fresh for maximum potency and to avoid bacteria growth. Most mixtures with fresh ingredients like egg, banana, or avocado should be discarded immediately. Oil-based mixtures can sometimes be stored in an airtight container in the refrigerator for a few days.
Should I apply my mask to wet, damp, or dry hair?
Damp hair is the ideal canvas. Dry hair can have a barrier of natural oils or product that prevents absorption, while soaking wet hair can dilute the mask. Applying to clean, towel-dried hair is the most effective method.
What is the difference between a DIY hair mask and a store-bought deep conditioner?
They serve a similar purpose, but the main difference is the ingredients. A DIY hair mask uses fresh, whole ingredients from your kitchen, free of preservatives and synthetic chemicals. Deep conditioners are formulated in a lab for a longer shelf life and may contain silicones and other ingredients to provide instant slip and shine.
Can a homemade hair mask help with hair growth?
While no mask can magically make hair grow faster, certain ingredients can create a healthier scalp environment, which is essential for optimal hair growth. Ingredients that stimulate blood flow to the scalp (like rosemary oil) or reduce inflammation and dandruff (like tea tree oil or oatmeal) can support the natural growth process.
Further Reading and Trusted Sources
To continue learning about the science of hair and best care practices, we recommend exploring these reliable resources:
- Rich Hair UK: A great source for in-depth articles on hair science, product ingredients, and advanced care routines.
- NHS Hair Care: For medically reviewed, trustworthy information on common hair and scalp conditions from the UK’s National Health Service.