Unlock Your Healthiest Hair: The Ultimate 2025 Guide to a DIY Hair Mask
Table of Contents
- Why Make a Hair Mask at Home?
- How DIY Hair Masks Work: Basic Hair Biology and Ingredient Roles
- Safety First: Allergy Tests, Sourcing Ingredients, and Kitchen Hygiene
- Key Ingredients and Their Effects
- Customizing Masks by Goal: Hydration, Protein, Scalp Care, and Shine
- Starter Recipes for Different Hair Types
- Application Techniques and Timing: A Step-by-Step Guide
- Tools and Storage: What to Use and How Long Masks Last
- Troubleshooting Common Problems and How to Fix Them
- FAQ: Common Reader Questions Answered
- References and Further Reading
Why Make a Hair Mask at Home?
Welcome to the world of personalized hair care! Creating your own DIY hair mask is a simple, affordable, and incredibly effective way to give your hair the specific nourishment it craves. Unlike many store-bought treatments that can contain synthetic fragrances, silicones, and preservatives, a homemade hair mask puts you in complete control. You know exactly what’s going onto your hair and scalp—fresh, natural ingredients straight from your kitchen.
The benefits are clear. You can tailor your treatment to address your hair’s unique needs, whether it’s combating dryness, repairing damage from heat styling, taming frizz, or boosting shine. It’s a sustainable practice that reduces packaging waste and connects you more deeply with your self-care routine. Crafting a DIY hair mask isn’t just about hair care; it’s a moment of mindful creation that results in healthier, more vibrant locks.
How DIY Hair Masks Work: Basic Hair Biology and Ingredient Roles
To understand why a DIY hair mask is so effective, it helps to know a little about your hair’s structure. Each hair strand has an outer layer called the cuticle, which looks like overlapping shingles. When hair is healthy, these cuticles lie flat, reflecting light and making your hair look shiny and smooth. When damaged, they lift, causing hair to look dull, frizzy, and prone to tangling.
The ingredients in a homemade hair mask play specific roles in restoring this structure:
- Moisturizers and Humectants: Ingredients like honey, aloe vera, and glycerin are humectants, which means they attract and hold onto water molecules. They draw moisture into the hair shaft, providing deep hydration.
- Emollients and Sealants: Oils (like coconut, olive, and avocado) and butters are emollients. They fill in the gaps between lifted cuticles, smoothing the hair’s surface. This not only makes hair feel softer but also seals in the moisture provided by humectants.
- Proteins: Hair is made primarily of a protein called keratin. Ingredients like eggs, Greek yogurt, and avocado provide proteins and amino acids that temporarily patch weak, porous spots in the hair shaft, adding strength and elasticity.
By combining these elements, you create a potent treatment that can restore balance to your hair, leaving it softer, stronger, and more manageable.
Safety First: Allergy Tests, Sourcing Ingredients, and Kitchen Hygiene
Before you start mixing your first DIY hair mask, it’s essential to prioritize safety. Just because an ingredient is natural doesn’t mean it’s right for everyone.
- Always Patch Test: Before applying a new mixture to your entire head, perform a patch test. Apply a small amount of the mask to a discreet area of your skin, like behind your ear or on your inner elbow. Wait 24 hours to check for any signs of irritation, redness, or itching. This is especially important if you have sensitive skin or known allergies.
- Source Fresh Ingredients: Use the freshest ingredients possible. A browning avocado is fine, but moldy yogurt is not. Freshness ensures you get the maximum nutrients without introducing unwanted bacteria to your scalp. Whenever possible, choose organic ingredients to avoid pesticide residues.
- Practice Kitchen Hygiene: Treat your hair mask prep like food prep. Use clean bowls, utensils, and a blender. Wash your hands thoroughly before you begin. This prevents the transfer of bacteria that could lead to scalp issues. Remember, you are creating a product without preservatives, so it’s meant for immediate use.
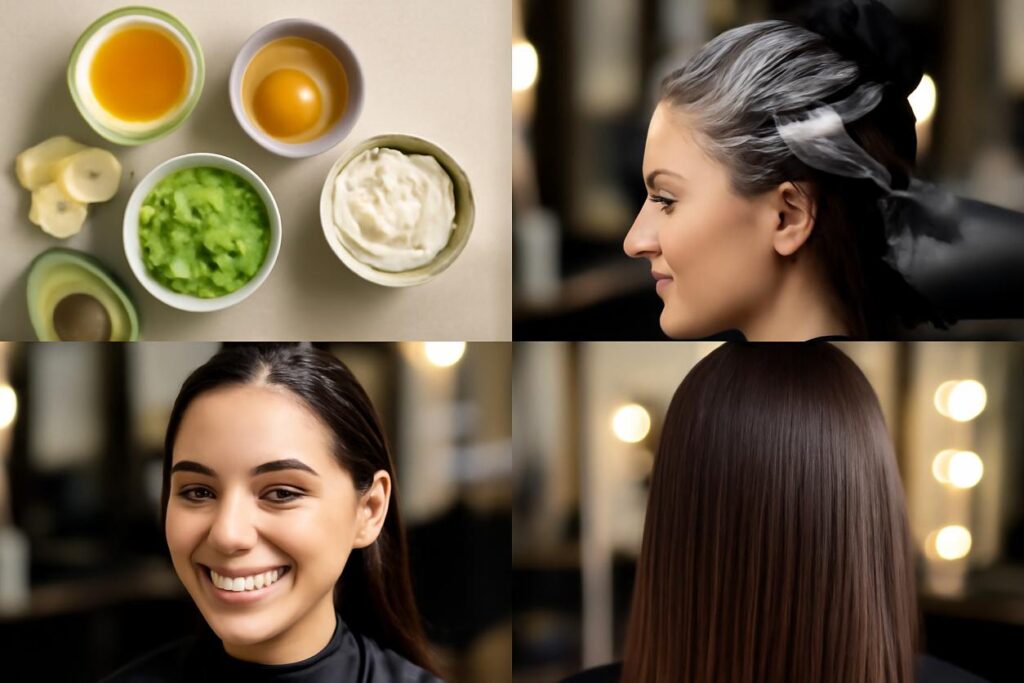
Key Ingredients and Their Effects
Your kitchen is a treasure trove of hair-loving ingredients. Understanding what each one does will empower you to create the perfect DIY hair mask for your needs. Here are some of the most popular and effective components:
| Ingredient | Primary Benefit | Best For |
|---|---|---|
| Avocado | Moisturizing and Strengthening | Dry, brittle, or damaged hair |
| Banana | Softening and Elasticity | Frizzy or weak hair |
| Greek Yogurt | Exfoliating and Strengthening | Dull hair or flaky scalp |
| Egg | Strengthening and Repairing | Damaged or fine hair |
| Honey | Hydrating (Humectant) | Dry or dull hair |
| Coconut Oil | Deep Conditioning and Sealing | Thick, coarse, or very dry hair |
| Olive Oil | Moisturizing and Shine-Boosting | Normal to dry hair |
| Aloe Vera Gel | Soothing and Hydrating | Irritated scalp or dry hair |
| Apple Cider Vinegar | Clarifying and Shine-Boosting | Oily scalp or product buildup (use diluted as a rinse) |
Customizing Masks by Goal: Hydration, Protein, Scalp Care, and Shine
The beauty of a DIY hair mask lies in its customizability. You can become your own hair care chemist by mixing and matching ingredients to target specific concerns. Think of it as building a formula based on your hair goals for 2025 and beyond.
For Deep Hydration
If your hair feels like straw, focus on ingredients rich in healthy fats, vitamins, and humectants.
- Base: 1/2 ripe avocado or 1 ripe banana.
- Liquid/Booster: 2 tablespoons of aloe vera gel or 1 tablespoon of honey.
- Oil: 1 tablespoon of olive oil or jojoba oil.
For Protein and Strength
To mend brittle, weak, or chemically treated hair, a protein-based mask is key. Be careful not to overdo it, as too much protein can make hair stiff.
- Base: 1 egg or 3 tablespoons of Greek yogurt.
- Booster: 1 tablespoon of coconut oil to add moisture and prevent protein overload.
- Tip: Always rinse protein masks with cool or lukewarm water to avoid “scrambling” the egg in your hair.
For Scalp Care
A healthy scalp is the foundation of healthy hair. If you’re dealing with dryness, flakiness, or itchiness, focus on soothing and anti-inflammatory ingredients.
- Base: 3 tablespoons of aloe vera gel or plain yogurt.
- Booster: 1 tablespoon of honey (for its antibacterial properties) and a few drops of tea tree or peppermint essential oil (diluted in a carrier oil like jojoba).
For Enhanced Shine
To combat dullness and boost radiance, use ingredients that smooth the hair cuticle and clarify buildup.
- Mask Base: 3 tablespoons of Greek yogurt (the lactic acid gently exfoliates) and 1 tablespoon of honey.
- Rinse Booster: After washing out your mask, do a final rinse with diluted apple cider vinegar (1 part ACV to 4 parts water) to seal the cuticle.
Starter Recipes for Different Hair Types
Ready to get started? Here are a few simple yet powerful recipes. Remember to blend all ingredients until completely smooth to avoid chunks in your hair.
Quick Five-Minute Masks
These are perfect for a speedy treatment when you’re short on time. Apply to damp hair, leave on for 5-10 minutes, and rinse.
- The 5-Minute Moisture Boost: Blend 2 tablespoons of aloe vera gel with 1 tablespoon of honey. This simple humectant-rich mask gives a quick shot of hydration without weighing hair down.
- The 5-Minute Shine Enhancer: Whisk together 3 tablespoons of plain Greek yogurt and 1 teaspoon of olive oil. The lactic acid and fats work quickly to smooth the cuticle and add instant shine.
Overnight Deep Treatments
For an intensive repair session, an overnight mask allows ingredients to penetrate deeply. Always wear a shower cap or wrap your hair to protect your bedding.
- The Ultimate Repair Overnight Mask (for Dry/Damaged Hair): Mash half a ripe avocado with one ripe banana and 2 tablespoons of olive oil. Blend until creamy. Apply from roots to ends, cover, and shampoo out in the morning.
- The Growth-Boosting Overnight Mask (for All Types): Melt 3 tablespoons of coconut oil and mix with 5 drops of rosemary essential oil. Massage thoroughly into the scalp and coat the hair strands. This treatment nourishes the follicles and deeply conditions the hair.
Application Techniques and Timing: A Step-by-Step Guide
Applying your DIY hair mask correctly is just as important as the recipe itself. Follow these steps for the best results:
- Prep Your Hair: It’s best to apply most masks to clean, damp hair. Shampoo your hair first to remove any product buildup, then gently towel-dry until it’s no longer dripping. This allows the mask to penetrate more effectively.
- Section Your Hair: Divide your hair into 4-6 manageable sections. This ensures you get even coverage from root to tip.
- Apply the Mask: Using your fingers or a clean application brush, work the mask through each section. If you’re targeting dryness, focus on the mid-lengths and ends. For scalp issues, gently massage the mixture into your roots.
- Let It Sit: Gather your hair on top of your head and cover it with a shower cap or plastic wrap. The heat trapped inside helps open the hair cuticle, allowing the ingredients to absorb more deeply. Let the mask sit for the recommended time (from 20 minutes to overnight, depending on the recipe).
- Rinse Thoroughly: Rinse the mask out with lukewarm water. Be patient and rinse until the water runs clear and your hair no longer feels slippery. For thicker masks, you may need to use a wide-tooth comb in the shower to help remove all the residue.
- Condition (Optional): For most hydrating masks, you can skip your regular conditioner. For protein masks, it’s often a good idea to follow up with a light conditioner to restore softness.
Tools and Storage: What to Use and How Long Masks Last
You don’t need fancy equipment to make a great DIY hair mask. A few simple kitchen tools will do:
- A small bowl for mixing.
- A fork, whisk, or small blender to ensure a smooth consistency. A blender is highly recommended for ingredients like banana or avocado to prevent clumps.
- An application brush (optional, but helpful for clean application).
- A shower cap or plastic wrap.
Because these masks are made from fresh food ingredients without preservatives, they are highly perishable. It is crucial to make a fresh batch for each use. Do not store leftover masks in the refrigerator for more than 24 hours. If the mixture looks or smells off, discard it immediately.
Troubleshooting Common Problems and How to Fix Them
Sometimes your DIY experiments might not go as planned. Here’s how to fix common issues:
- Problem: My hair feels greasy or weighed down.
Solution: You likely used too much oil or didn’t rinse thoroughly enough. Next time, reduce the amount of oil in your recipe, concentrate the application on your ends, and rinse with extra care. A clarifying shampoo can help remove the excess residue.
- Problem: The mask was difficult to wash out.
Solution: The mixture wasn’t blended smoothly enough. Bits of banana or avocado can be stubborn. Always use a blender for solid ingredients to create a completely lump-free puree before applying.
- Problem: My hair feels dry or straw-like after a protein mask.
Solution: This is a sign of “protein overload.” Your hair may not have needed that much protein, or the mask lacked a moisturizing balance. Always include a moisturizing ingredient like oil or aloe vera in your protein masks and don’t leave them on for too long. Use a deep conditioning mask next time to restore moisture balance.
FAQ: Common Reader Questions Answered
How often should I use a DIY hair mask?
It depends on your hair’s needs. For general maintenance, once a week is a great routine. If your hair is extremely damaged or dry, you can use a hydrating mask up to twice a week. Protein masks should be used more sparingly, typically once or twice a month.
Can I use a DIY hair mask on color-treated hair?
Yes, but with caution. Most moisturizing masks with ingredients like avocado, banana, and oils are perfectly safe for colored hair. However, be careful with highly acidic ingredients like lemon juice or apple cider vinegar, which could potentially affect your color over time. Always do a strand test if you’re concerned.
Can I substitute ingredients in a recipe?
Absolutely! That’s the best part of a DIY hair mask. If you’re allergic to eggs, use Greek yogurt for protein. If you don’t have coconut oil, olive oil or jojoba oil are great alternatives. Refer to the ‘Key Ingredients’ section to make smart swaps based on your goals.
References and Further Reading
Learning about your hair is an ongoing journey. To dive deeper into the science of hair care and how what you eat affects your locks, we recommend exploring topics on hair nutrition and consulting reputable sources on cosmetic science. Building a strong foundation of knowledge will help you perfect your at-home treatments. Thank you for reading and happy mixing from your friends at Rich Hair UK!